7 Tips To Smoke The Perfect Stack Of Ribs
At first glance, smoked ribs can be quite complicated and a challenge to any new home cook. The good news is that with a bit of effort, you can recreate this delicious recipe by yourself this summer! But the question is, how do you smoke ribs at home?

In this article, we will introduce you to seven useful steps as well as the 3-2-1 method. As the name suggests, this rib method consists of three definite steps, each of which takes 3, 2, and 1 hour respectively. We will review it in detail to help you make tasty pork ribs with amazing flavor.
From our experience, we also find out that there are some common mistakes that novices frequently make. Considering that, we've prepared this helpful pork ribs recipe in the easiest guide you'll ever need.
Overall, here are some key points that we will address:
- How To Smoke Ribs At Home?
- Common Mistakes While Smoking Ribs
- Recommended Recipes That Go Well With Smoked Ribs
How To Smoke Ribs At Home?
In this section, you will learn our superb restaurant-quality smoked ribs recipe in seven useful steps.
Step 1: Choose Quality Meat

- Baby back ribs: It is one of the most popular rib cuts. As the name suggests, rack baby meat derives from the muscle on the back of the pig. Most people love it because it is meaty, lean, tender, and of course, high-quality.
- Spare ribs: As the name suggests, it is the “spare” meat that remains at the pig’s belly, since people often use the belly section for bacon. Although spare ribs are not as meaty as baby back ribs, they take less cooking time on the smoker.
- St. Louis Style ribs: Basically, it derives from the same cut as spare ribs. The only difference is that St. Louis style ribs have a unique rectangular shape, making them easy to cook evenly.
By learning about the differences between these ribs, you can pick the most suitable one according to your needs and preferences.
Step 2: Pick The Suitable Type Of Wood Chips

Instead, a lighter fruitwood is the perfect choice for bone-tender ribs. You can try any one of these wood chips:
- Cherry
- Hickory
- Pecan
- Oak
- Grapevine
- Mesquite
Step 3: Remove The Membrane

This step is especially important as it will determine whether you will get bone-tender ribs or not. Fortunately, it is not difficult at all to remove the membrane.
In case you do not know where the membrane is, here are some tips. Look for the whitish, silvery skin on the backside rack of ribs - that is what you need to remove.
Firstly, slide the knife under the silvery membrane, then pull up on the skin. You can start in any direction along the rack of ribs.
Next, lift and loosen the skin in the process. Do it gently and patiently so that you won’t hurt yourself. Once you feel it is loose enough, you can grab the membrane with your hands and simply pull it.
If the silver skin suddenly breaks along the way, don’t worry - just use the knife and start over at any section of the ribs.
You will need a small, rounded knife for this task. A sharp knife is not advisable since it may cut off the membrane along the way, making it even more challenging to remove.
You may be wondering why it is necessary to remove the silver skin. The answer is simple: Without the membrane, the meat will cook faster and more evenly. The ultimate result is that you get juicy, tasty, tender bone ribs.
Step 4: Season The Ribs

Rib rubs are indispensable if you are going for a delicious ribs recipe. Generously rubbing the ribs with a butter bath or a blend of spices can bring out the pork’s lightly sweet flavor.
Cover the ribs with yellow mustard and make sure to spread it evenly. Next, rub it with a mixture of spices - or the dry rubs. Then, wrap ribs in tin foil and let them chill in the fridge.
Usually, two hours is enough for the spices to penetrate through. But if you want tasty, finger-smacking food, we suggest leaving the pork ribs overnight.
In case you don’t know any dry rub recipes, here are some recommendations. Spices include salt, brown sugar, and pepper flake. You can also add some powder, such as onion, garlic, and chili powder. A little amount of Hungarian paprika or ground cumin is also advisable.
Step 5: Smoke The Ribs
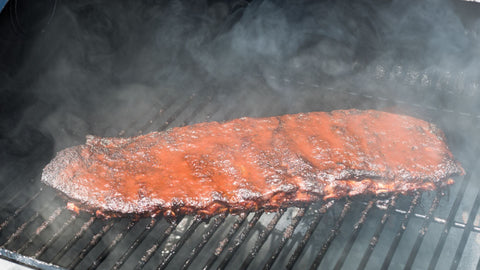
From here, we will apply the 3-2-1 ribs method mentioned above.
First of all, preheat your smoker for a few minutes before smoking (preferably 225F degrees).
You already know what to do next - place the ribs bone side down and leave them on for 3 hours of smoking.
While you are at it, don’t forget to spritz ribs on the smoker with apple juice once every 30 minutes. By doing this, the food will be amazingly tender when finished.
Here are some extra tips: You can coat the ribs in foil with some apple cider or butter bath while smoking to get better results.
Step 6: Wrap In Foil

This stage is when the ribs become bone tender.
Remove the ribs from the smoker. Use a piece of aluminum foil or tin foil if you prefer. You can add a little more beer or apple juice mixture using a spray bottle in this step. Neatly seal the foil to ensure that the moisture doesn’t leak out, and the steaming process takes place perfectly.
Next, place the ribs on the smoker again for 2 additional hours. Keep in mind that the internal temperature should be the same as the previous step - 225F degrees. Or, if you prefer, an oven can be a useful alternative in this case (with the same degrees).
Step 7: Sauce And Serve

Congrats - you’ve come quite a long way! Just finish this final step and your pork ribs are ready to serve.
When you’ve finished the previous step, carefully transfer ribs from the smoker and remove ribs from the foil. Use your favorite sauce and generously coat it evenly on the ribs.
Although the food itself has amazing flavor, ribs with sauce will be much tastier. In case you want to eat with no sauce, go ahead. Ribs with no sauce are great for those on a diet.
Next, place the pork on the smoker once again for 1 last hour. That’s it; you’ve done it!
We want to give you some extra tips to get a crunchy BBQ sauce bark at this stage. When you almost finish smoking the ribs, unwrap the foil and coat the food with a thin layer of sauce. Let it continue to smoke for a few minutes. When it is nearly firm, add another layer of sauce then repeat the process for an additional 15 minutes.
Finally, you know what to do already - serve the food and enjoy it!
Common Mistakes While Smoking Ribs
If you are a beginner, it is only natural that you might have made some mistakes along the way. The thing is, only one single mistake is enough to lead to a failure of cooking. Having taken that into consideration, we’ve prepared a list of possible issues and solutions.#1 You Smoke The Ribs Bone Side Up
We mentioned this a few times previously, but some people might forget and unknowingly smoke the ribs bone side up. In this case, the juice will pool in the rib bone’s concave center, blocking the smoke. It is the culprit that makes pork ribs dry.
Therefore, you should always remember to place them side down.
#2 You Leave The Membrane On
As explained above, removing the membrane is necessary to get fall-off-the-bone meat. Since the pork skin is very tough, it may prevent the smoke from penetrating. Consequently, the ribs will become undercooked. Even if they get cooked evenly, the meat won’t be as tender.
For this reason, we highly recommend you get rid of the skin before smoking. You can do it by yourself by following our useful guidance above.
#3 You Chose The Wrong Type Of Wood Chips
We have listed wood chips that create light smoke above. You can choose other types as well, but keep in mind that those producing strong, heavy smoke are not advisable.
If the smoke is too heavy, the pork meat will lose its original slightly sweet taste. You sure don’t want to eat meat with too much smoky flavor.
That said, here are some wood chips to avoid: elm, cypress, fir, spruce, sycamore, or eucalyptus.
Recommended Recipes That Go Well With Smoked Ribs
That is the ultimate guide to the smoked ribs recipe. With that in mind, here are some easy sides that pair well with smoked ribs. Whether you are a home cook or a professional chef, you can learn and make it with tremendous ease.#1 BLT Pasta Salad
The first recipe we want to introduce to you is BLT pasta salad. Undoubtedly, salad is the perfect dish to go with smoked meat, even for those on a diet.
#2 Oil And Vinegar Coleslaw
Oil and vinegar coleslaw can also pair well with smoked ribs. Not only that, this dish is very good for your health thanks to cabbage as its main ingredient.
#3 Classic Potato Salad
You can use classic potato salad as a side dish to eat with smoked ribs. The unique taste of potato combines very well with the sweet taste of meat.
Now that you’ve learned the smoked ribs recipe - the 3-2-1 ribs method in this article. We also included the three most common mistakes as well as corresponding solutions. All you need to do is to follow our guideline closely, and you will get delicious, finger-licking smoked ribs at hand!
Besides, our three recommended side dish recipes are super easy to make. So, what are you waiting for? Go straight to the kitchen and try them out! Also, if you have other favorite recipes, feel free to share them with us! It would be really great to learn more about rib recipes.
For further information about this article, don’t hesitate to contact us! We always welcome possible questions and answer them to the best of our knowledge.
Leave a comment
Comments will be approved before showing up.